Stamping Sunday Blog Hop Sneak Peek May 2019
- Sharni Haines
- May 26, 2019
- 4 min read
Updated: Aug 25, 2019
Hello lovelies, a big welcome to the Stamping Sunday Blog Hop. This month's theme is a Sneak Peak of our favorite pre-order stamp set.
I'm Sharni Haines from Australia you may have started here or come from the wonderful Danielle Bennenk either way have a look and keep on hopping around to see what fabulous creations everyone has to share with us!
As Demonstrators, we are able to pre order some products from the new catalogue before it goes live next month (June 4). I thank my lucky stars that there were some fantastic products available to us that I really loved! Infact, it was a toss up of which one to choose for today's theme.
Being a lover of all things 'bird', I decided to put my focus onto the Free as a Bird Suite. It really is lovely. After all, 'everything is better with a bird on top.'
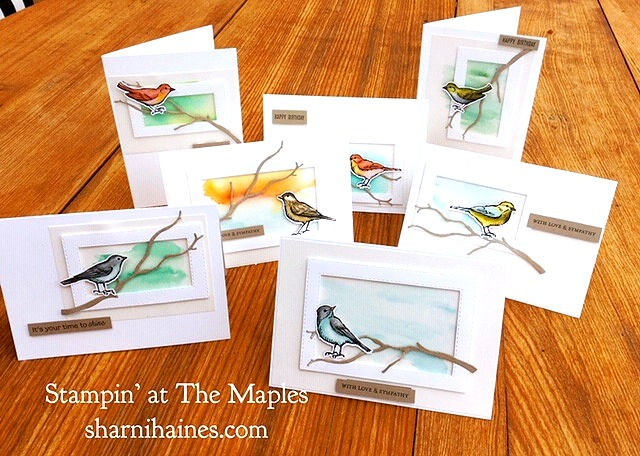
Does it look like I had some fun? Yes I did, and I just couldn't seem to stop!
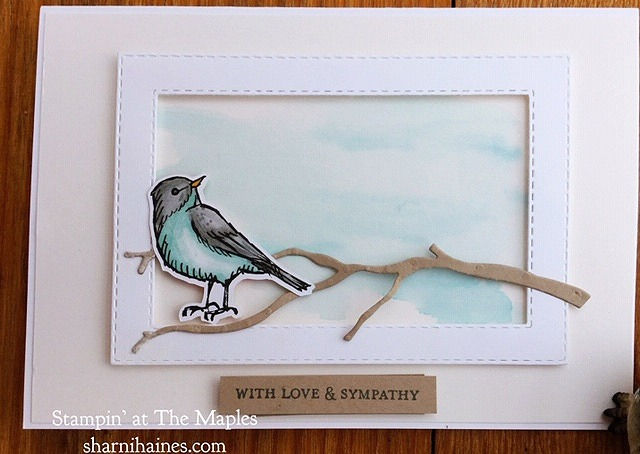
All the card bases are Thick Whisper White. I painted on a bit of colour onto Shimmery White Cardstock with my Aqua Painter and once dried, glued onto the base.

I cut out rectangle frames with the Rectangle Stitched Framelits and mounted them over the top of the Shimmery Paper with Dimensionals.

All the birds were cut out from the Bird Ballad DSP - I just love this because its so quick! I do love to colour in my images, but when they look as good as this, you don't need to.
I used Crumb Cake Cardstock for the tree branch and sentiment. The branch is from the Seasonal Layers Thinlits Dies.

I like the clean simplicity of these cards, and they can be suited to many occasions. I probably would have kept making these, but I ran out of Shimmery White Cardstock!

My next project shows off the beautiful Bird Ballad DSP. It's a Mini Photo Album consisting of 6 pages. (12 total)

As you can see, each page gets a little longer than the previous one..by 1/2" each time.
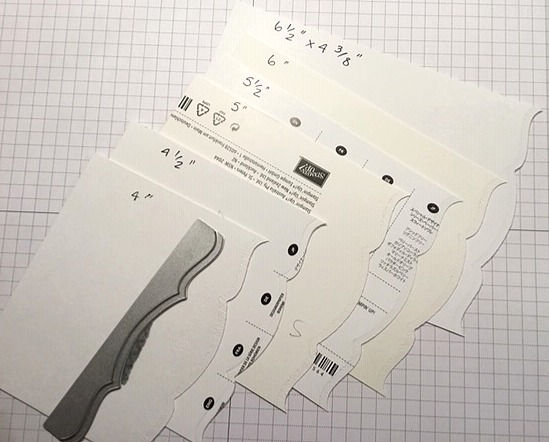
I recycled the cardboard base that the DSP comes packaged with to create strong and thicker pages. They were all cut 4 & 3/8" then each length increased from 4" to 6 &1/2".
I used the Die from the new Magnolia Memory Dies and this was perfect to give an interesting finish to all the edges of each page.

I then cut 2 pieces of DSP to cover both side of each base. The Cardstock I chose was Pool Party, Powder Pink & So Saffron.

Every edge was inked with Crumb Cake and I kept all the off cuts from the Die cuttings and inked them up too.

I randomly placed these 'offcuts' onto all my pages. But before I did this, I punched holes into the pages and repunched them once the offcuts were glued in place..otherwise it becomes too thick and hard to punch.

PAGES 1-2
I have made a short video showing all the pages, but here are some still images showing you some details on each page. The White Binder rings are from Office Works, I think you can get them at some news agencies as well.

PAGES 3-4
All the blank spaces are for future photos...I only put this together this morning, so no time for anything like that!! But I do have someone special in mind for this album.

PAGES 5-6
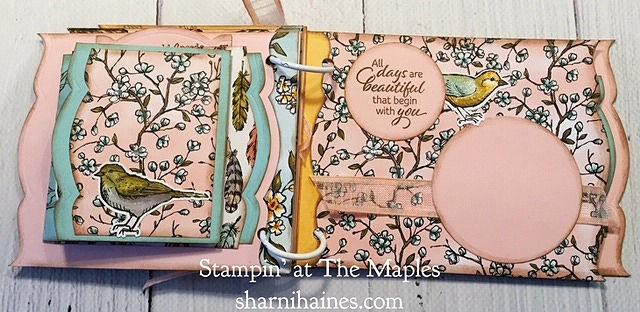
All the circles were cut from the Layering Circles Dies, I used Soft Sued to stamp all the sentiments and images. The rectangle tags are from Rectangle Stitched Framelits.
PAGES 7-8
This page has a pull out element, it gives you more space to add some more photos or journaling.

The flowers are stamped from the Free as a Bird set and coloured with Blends. (see first photo for all the blends I used).

PAGES 9-10
The label on page 9 is from the new Sail Away Suite (Smooth Sailing Dies), it's a useful Die for small sentiments etc. I cut the blue one in half and matted it behind the White one with a piece of the new Petal Pink Organdy Striped Ribbon. (A little trick to make the matted one appear bigger).
A last note, you can't really see it but I Winked the 'Stella' out on every beautiful bird in this album to let them shine a little more. And I had placed a few Rhinestones about the place, mainly on the flowers for a little bit of bling.

I was about to glue it and thought it might me useful to show you how to use one size die but make it look bigger...simply cut it in half and adhere behind the first piece.
Here is a very short video showing you all the pages in action.
Well that's all for now!
I hope you found my ideas interesting, useful and inspirational and it put a smile on your face. Thank you for your coments, they always make me smile!
A big thank you to the lovely Sara Levin for inviting me to the hop!
Ensure you keep going with the Hop to see everyone else's beautiful work....I can't wait to see what's been created! Just click on the links below to see more! Next up is the lovely... Rochelle Blok
Take care,
loves & hugs,
Sharni. x
Want to order anything? Please do! Just go to my shop and don't forget to leave your name so I can send you a big thank you in the post and any rewards you have earned through me!
Thank you for supporting my little business. x
Want all your products at a discount? Join my team! Learn more here.


.jpg)
.png)
Absolutley lovely projects, Sharni. From your cards, to your Mini Album + instructions, thankyou for your inspiration. D x
Love your projects Sharni! Great work coloring all the birds! I also do that everytime we have a bird stamp :) And your mini-album is so beautiful.. Love it!
Love, Love your Projects and I love your Blog...I'm going to have try them all.
Sharni these are stunning. I love them all. Thanks so much for the photo tutorial, I get a bit tired of videos and love just being able to take my time and absorb all the beauty in each image. You are very talented
Your projects are beautiful Sharni ... love them both!